
Essential Beginner Tips —
WARDOGS Guide
Ten critical strategies every new WARDOGS player needs to master — from ammunition choice and squad coordination to class leveling and tower control.
For anyone stepping onto the WARDOGS battlefield for the first time, the experience can be both thrilling and overwhelming. This competitive three-faction shooter demands that players manage their economy, coordinate with teammates, control territory, and make rapid tactical decisions all at once. Whether your goal is to climb the class ranks, accumulate in-match currency, or simply hold your own against more experienced opponents, understanding the fundamentals before you drop in will make a measurable difference. The ten tips covered in this guide are drawn directly from the game’s core mechanics and are aimed squarely at players who are still finding their footing in the chaos of a live match.
Choosing the Right Ammunition Type for Every Engagement

Ammunition is not a one-size-fits-all consideration in WARDOGS. Every weapon in the game supports three distinct bullet types — Armor Piercing, Full Metal Jacket, and Hollow Point — and knowing when to use each one can shift the outcome of an engagement in your favor. Armor Piercing ammunition is the correct choice when facing opponents who are wearing protective gear; its damage output scales upward the heavier and more comprehensive their armor is, making it essential when dealing with well-equipped enemies. Full Metal Jacket rounds occupy the middle ground, performing adequately against targets regardless of what they are wearing. If you are unsure what the enemy team has purchased or you simply want a dependable load for any situation, FMJ is a reliable default. Hollow Point ammunition, on the other hand, is most potent when used against lightly equipped or unarmored opponents — in those situations, it outperforms the other two options significantly. Always pay attention to what equipment enemies drop when you eliminate them in or around the control point, as this gives you direct intelligence on what ammunition types the opposing faction is favoring.
| Ammo Type | Best Against | When to Use |
|---|---|---|
| Armor Piercing | Heavily armored enemies | Facing well-geared opponents |
| Full Metal Jacket | Any target type | Unknown loadout situations |
| Hollow Point | Unarmored or lightly equipped | Confirmed low-gear targets |
Use Autopack to Manage Loose Ammunition More Efficiently
Rather than spending money on multiple pre-loaded magazines — which continue to take up valuable inventory space even when empty — the smarter approach is to carry loose ammunition and repack it on the fly. WARDOGS gives every player the option to automatically redistribute loose rounds into empty magazines by pressing the C key from the inventory screen. The game fills magazines from left to right in your inventory, making it a fast and predictable method for keeping your weapons topped off mid-fight without stopping to manually sort your kit. Prioritizing loose ammo over stacked magazines is strongly advisable, not only because it conserves inventory slots but also because ammunition boxes disappear from your inventory once exhausted — removing the dead-weight problem that empty magazines create. Additional loose rounds can be picked up from supply boxes scattered across the map or purchased from equipment vendors whenever you locate one during a match.
Earn Early XP Through Scouting and Spotting Enemies

Beginners tend to overlook the binoculars and basic optical scopes available in the early game, but these tools offer a reliable method for generating XP without needing to win firefights. Highlighting an enemy and marking them for your team shares real-time positional data with your allies, which in turn earns you points and a modest cash reward once that flagged enemy is eliminated — provided the elimination follows your spot within a reasonable window of time. If too much time passes between your spot and the kill, the reward disappears. The large towers scattered around the map are particularly productive spotting positions, since they overlook heavily contested zones and often have enemy sharpshooters positioned on their edges or in the surrounding forest lines. Camping one of these elevated locations with binoculars in hand is a low-risk, high-reward activity for newer players who aren’t yet comfortable in direct combat.
Every enemy you successfully spot and subsequently eliminated earns you both XP and in-match currency, making binoculars an essential early-game investment for building your economy without engaging in high-risk gunfights.
Stock Extra Bandages for Teammate Healing and XP Gains
Bandages occupy minimal space in your backpack and are inexpensive enough that bringing two or three stacks instead of one is rarely a mistake, even if you don’t exhaust the entire supply before a match ends or you respawn. The reason to carry extras goes beyond personal survivability — applying bandages to injured teammates earns you a cash return that consistently exceeds what you paid per bandage, meaning every heal you perform on an ally is net-positive for your economy. On top of the monetary benefit, each teammate you heal contributes XP to both your Medic class and your overall player level, making bandage management a dual-purpose strategy that supports your progression while simultaneously strengthening your squad’s combat effectiveness.
The Self Resuscitator Is a Free XP and Money Tool
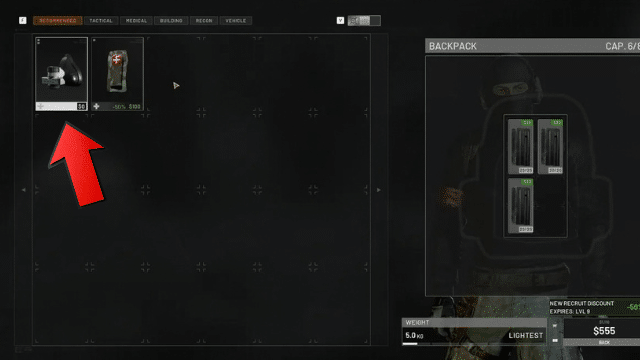
Located next to the bandage listings in the Items section of the equipment vendor, the Self Resuscitator is a free item that almost every beginner should make room for in their loadout. It functions as a fast-use revival tool for downed players, completing the revive action significantly faster than the default method of manually performing the action without an item. Speed matters enormously in this context — the longer you crouch beside a downed teammate, the more exposed you become to enemy fire. The Self Resuscitator shortens that window considerably, keeping you mobile while still providing your teammates with a second chance on the field. Each successful revive also earns you XP and in-match currency, making it one of the best tools available for building your economy in the early stages of your time with the game.
Free Item Alert: The Self Resuscitator costs nothing at the equipment vendor. It revives downed players faster than the default revival method, earns you XP and money for each successful use, and keeps you less exposed during the process. There is no reason not to carry one.
Always Join or Create a Squad for Better Coordination
At the match selection screen, players have the ability to create or join an existing squad within their faction before deploying. Squads are designed to keep a subset of the broader faction’s players working in tighter coordination with one another, and they provide meaningful structural advantages over going it alone. Voice communication within a squad is private — others on your faction cannot hear those conversations — which allows for strategic callouts and coordinated pushes without broadcasting your plans. Squad members also appear distinctly on the mini-map, meaning if you or a teammate goes down, others can immediately locate that player and move to revive them. This mini-map visibility alone is reason enough to join a squad even if you’re playing without a pre-formed group of friends, since it gives your immediate unit of players more information than the broader faction receives.
Looting Defeated Enemies Can Upgrade Your Gear Without Spending
After eliminating an opponent, pausing for a few seconds to check what they were carrying is a habit worth developing early. Any equipment left behind after they’ve been downed and opted to respawn is freely available for you to take, which can dramatically improve your kit without touching your in-match cash balance. This approach is particularly effective for players who entered the match with a minimal loadout — taking on an enemy with cheaper gear and then inheriting their superior equipment is a legitimate progression pathway. The obvious trade-off is that looting exposes you to incoming fire, since you must remain near the downed player long enough to search them. Doing so near active combat is a calculated risk, but near allies who are already engaging nearby enemies, that risk is considerably reduced.
Defend and Capture Towers to Control the Hot Zone
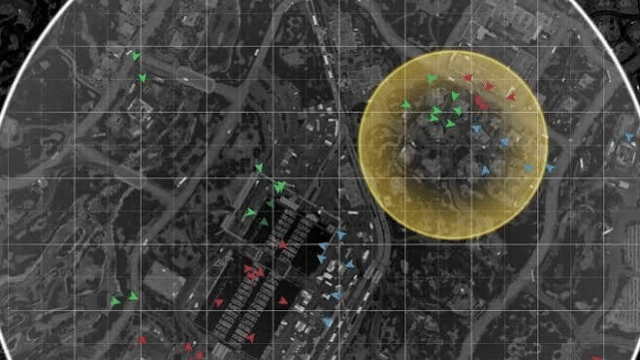
Towers are fixed positions on the map that serve multiple strategic purposes. First, they provide defensible elevated ground that can anchor your faction’s presence in and around the control zone — the more of your faction’s players who are inside the control zone when a point ticks, the more score your team accumulates. Second, each tower your team unlocks reveals a specific code, and accumulating enough of these codes allows a player to input them at any friendly-controlled tower to temporarily relocate the Hot Zone to that tower’s position, accelerating the rate at which your faction earns points. Beyond that, towers are also connected to the drill mechanic, which requires fuel and a helicopter delivery to bring the drill to a specific tower location — offering an alternative method of manipulating where the Hot Zone is active. Holding towers, repairing defenses, and pushing back enemy assaults are all productive activities that protect these strategic advantages.
The Hot Zone is a smaller, more concentrated area within the broader control zone that doubles the scoring value of each player standing inside it. Relocating the Hot Zone to a tower your faction controls — using codes gathered from captured towers — can significantly accelerate your team’s path to 100 points.
Save Time Between Lives with the Rebuy Loadout Function
Every equipment vendor in WARDOGS supports a rebuy function that reconstructs your last purchased loadout with a single command, visible as an icon in the lower left portion of the screen when you’re interacting with a vendor. This feature exists specifically for situations where you’ve respawned and need to get back into the field as quickly as possible without navigating multiple menu screens to rebuild the same kit you had before. The limitation is that the rebuy function is all-or-nothing — if you want to make any change to your loadout, even a minor one, you’ll need to purchase everything individually from the relevant menus. For straightforward respawns where the goal is simply returning to action fast, however, the rebuy option is among the most efficient tools available to you.
Understanding Class Progression Unlocks Better Equipment Faster
Each of the six playable classes in WARDOGS has its own independent XP track, and knowing what actions contribute to each track helps you level toward the gear you actually want instead of progressing randomly. The Assault class advances through combat using assault rifles. The Medic class earns XP both by using SMGs in combat and by healing or reviving teammates. The Recon class levels through engagements with sniper rifles and DMRs, as well as by spotting enemies using binoculars. The Support class gains XP from shotgun and LMG kills and also from constructing support structures or resupplying allies. The Driver class progresses by operating vehicles, transporting teammates between locations, and moving supplies across the map. Finally, the Pilot class levels by safely flying helicopters and delivering other players to their destinations. Aligning your playstyle with the class whose equipment you want most is the fastest way to unlock more capable gear in that specialty.
Levels up through assault rifle engagements and enemy eliminations.
XP earned via SMG combat, teammate healing, and reviving downed allies.
Advances through sniper rifle and DMR use, plus binocular spotting.
Levels via shotgun and LMG kills, building support structures, and resupplying.
Progresses by piloting vehicles, transporting players, and moving supplies.
XP earned by flying helicopters and safely delivering players to objectives.
From the Front Lines: Building Your Foundation in WARDOGS
Mastering WARDOGS as a beginner is less about mechanical perfection and more about understanding how its layered systems interact. Choosing the right ammunition, maintaining a stocked and sensible loadout, using free items like the Self Resuscitator, coordinating through squads, defending towers, and aligning your in-game actions with the class you want to develop are all habits that compound over time. None of these tips require exceptional aim or prior experience — they simply require awareness and intention. The players who progress fastest in WARDOGS are not necessarily the most aggressive; they are the ones who contribute consistently to the team’s economy and objectives every single time they are on the field.